Arduino SD Card Module Data Logger
“As an Amazon Associates Program member, clicking on links may result in Maker Portal receiving a small commission that helps support future projects.”
This tutorial will explore the range of capabilities available to the Arduino SD library by using a real-world example of data logging. The SD library allows users to read/write, list files, create/remove files, and make/delete directories. Additionally, we will develop an algorithm that creates a new file every time the Arduino board is restarted, which will prevent overwriting of existing data records. The resulting data file will be in comma separated format and contain multiple data points, including a time stamp in milliseconds since the program started. Therefore, it is important to record the program start time. For very accurate time monitoring tasks, a real-time clock is recommended, however, for the experiments conducted here, relative time suffices.
The primary components used for this tutorial are the Arduino board and SD card module, as such, those are the only required components. However, a real-world example will be carried out with the BME280 pressure sensor, which outputs pressure, temperature, and humidity. It also contains an algorithm that converts pressure to altitude - so we will be logging that as well. A lithium-polymer (LiPo) battery will be used so that the datalogger can be portable, which requires a breadboard and 3.7V to 5.0V regulator to also be required. Resultantly, the entire parts list is given below for the portable datalogger:

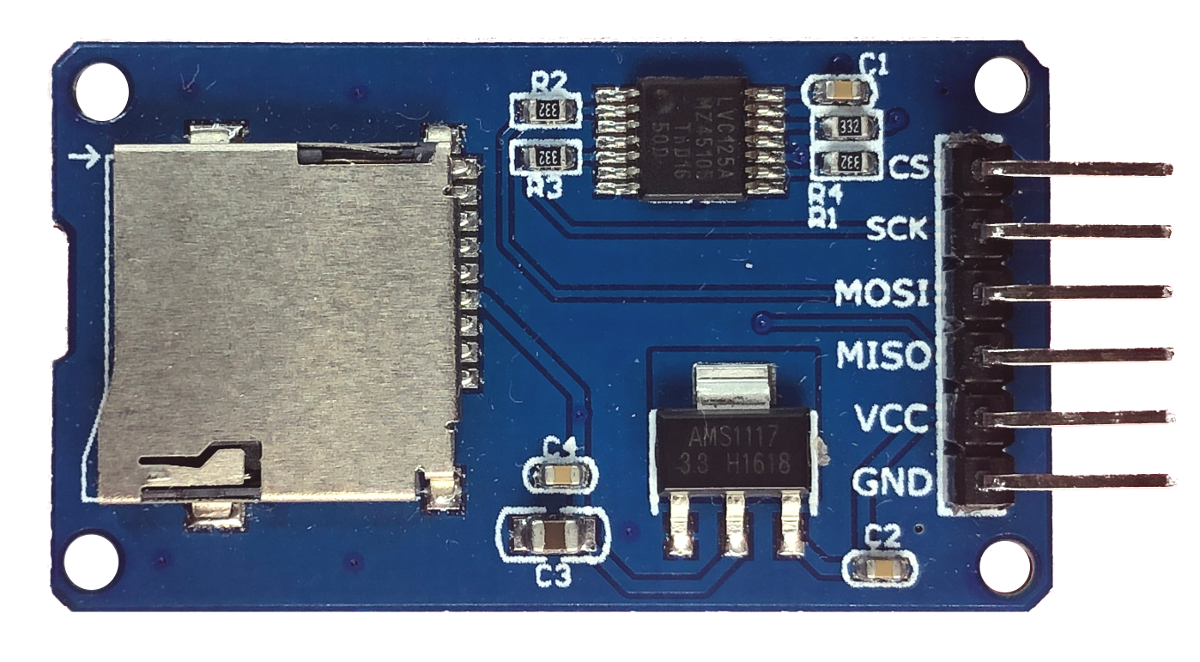
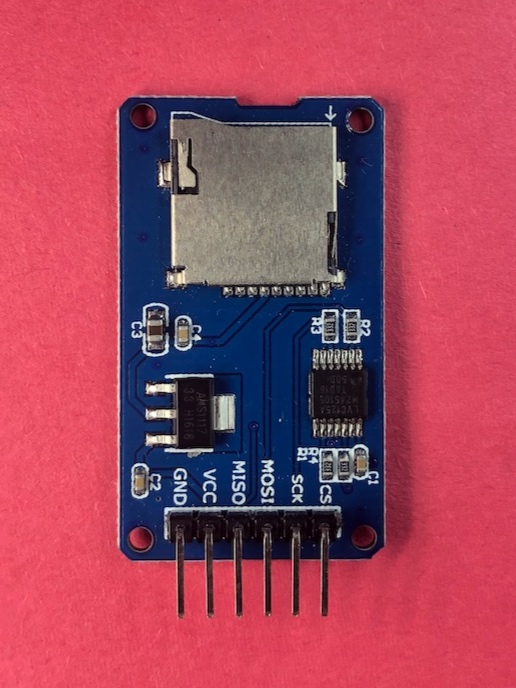
Arduino Micro SD Card Module - $8.00 [Our Store]
Arduino Uno - $13.00 [Our Store]
16GB SD Card and USB Adapter - $10.00 [Our Store]
BME280 Pressure Sensor - $9.00 [Our Store]
3.7V/600mAh LiPo Battery w/USB Charger- $12.00 [Our Store]
3.7V to 5V Boost Converter - $7.99 (2 pcs) [Amazon]
Mini Breadboard - $3.00 [Our Store]
We will start by wiring the entire set of parts to the Arduino board. This will allow us to move from dealing with just the SD card to saving and storing data to the SD card from the BME280 pressure sensor. The wiring digram is shown below:
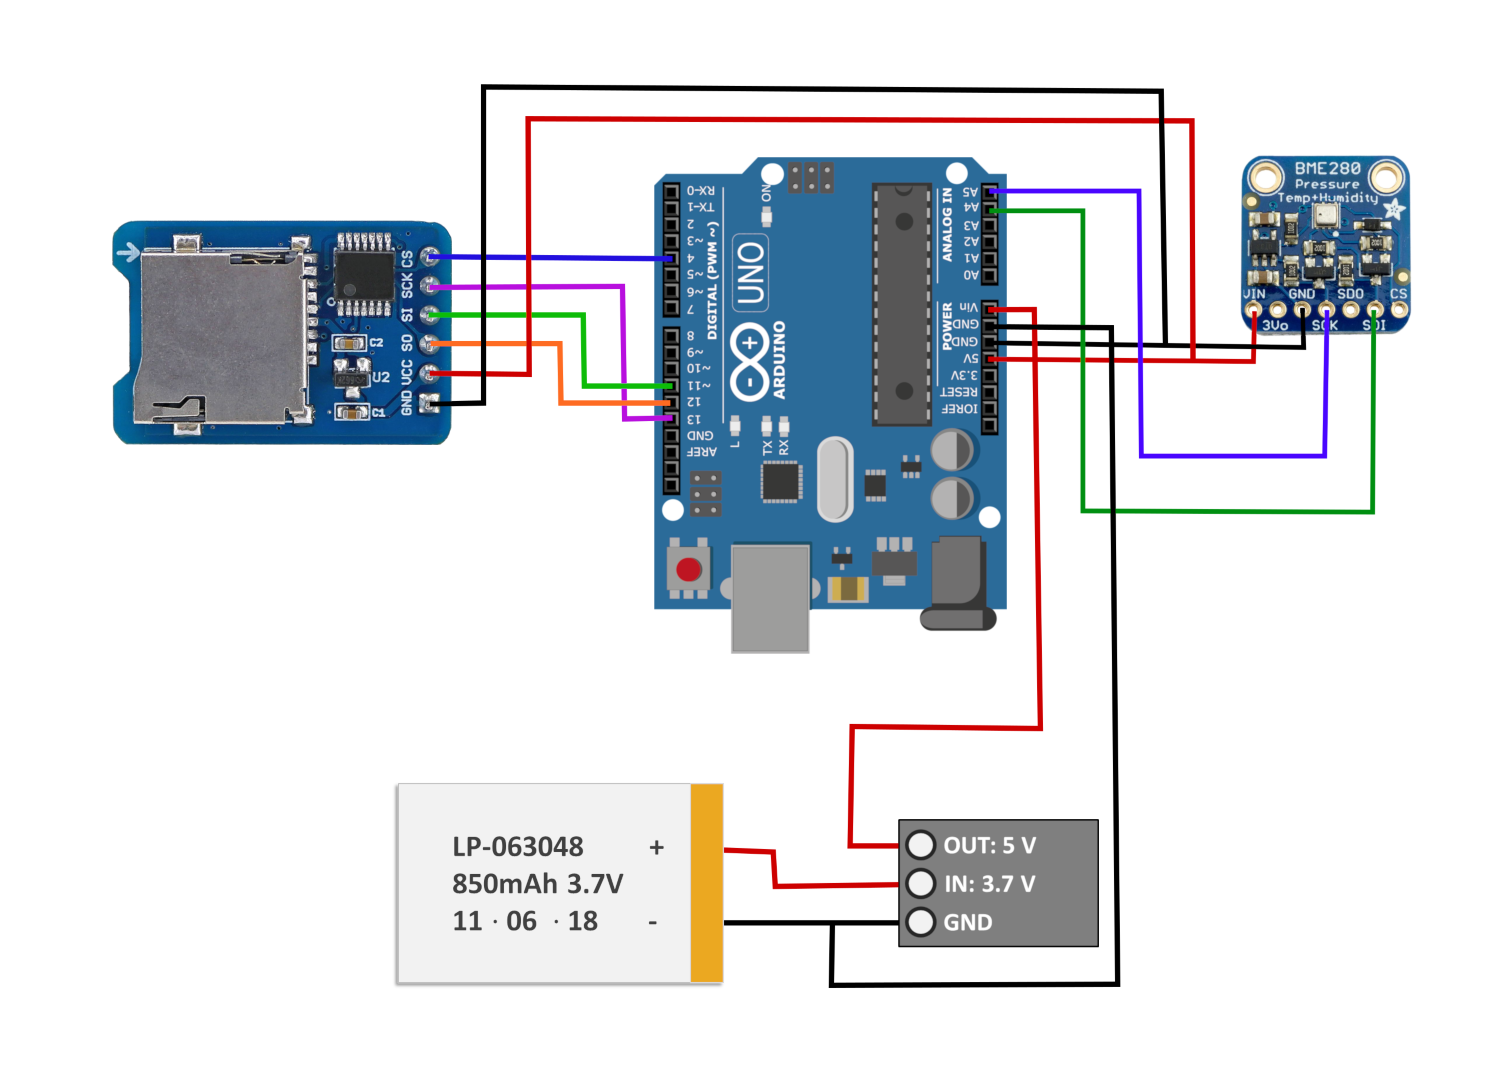
Wiring the Arduino to Battery, SD Card Module, and BME280 for Data Logging
The corresponding wiring table is also shown below.
| Arduino Pin | BME280 Pin | Arduino Pin | SD Card Module | |
|---|---|---|---|---|
| 5V | VIN | 5V | VCC | |
| GND | GND | GND | GND | |
| A5 | SCK | D11 | MOSI | |
| A4 | SDI | D12 | MISO | |
| D13 | SCK | |||
| D4 | CS |
In the next section we will read and write to the SD card.
This tutorial focuses on creating files and saving data to them in a simple and ready-to-use format. Assuming the SD module is correctly wired to the Arduino module adherent to the diagram above, we can start by reading and writing files to the SD card. The micro SD card must be formatted using the FAT16 file system as per the suggestions on the Arduino website [here]. Below is a simple routine that writes and reads data to the SD card, ensuring that the wiring and formatting were done properly:
#include <SPI.h>
#include <SD.h>

File testfile;
String fileName = "test.csv";
volatile int int_iter = 0;

void setup() {
  Serial.begin(9600); // start serial port
  // wait for SD module to start
  if (!SD.begin(4)) {
    Serial.println("No SD Module Detected");
    while (1);
  }
  // see if test file exists, delete it if it does
  // then prints headers and starts new one
  if (SD.exists(fileName)){
    Serial.println(fileName+" exists, deleting and starting new");
    SD.remove(fileName);
  }
  testfile = SD.open(fileName, FILE_WRITE);
  if (testfile) {
    // save headers to file
    testfile.println("Timestamp,Data");
    testfile.close();
  } else {
    // if the file didn't open, print an error:
    Serial.println("error opening file");
  }
}

void loop() {
  // save new integer every loop and then wait 1s
  testfile = SD.open(fileName, FILE_WRITE);
  if (testfile) {
    // save a different number each loop
    testfile.println(String(millis())+","+String(int_iter));
    testfile.close();
    Serial.println("Saving "+String(int_iter));
  } else {
    Serial.println("error opening file");
  }
  int_iter+=1;
  delay(1000);
}
The code above looks for a file called “test.csv” and deletes it if it already exists and creates it if it doesn’t. Then the program saves headers called “Timestamp” and “Data.” It opens and closes the “test.csv” file each loop and saves the milliseconds since the program started and an iterating integer. If we subsequently run the built-in Arduino SD script called “DumpFile” - which dumps the contents of an SD card, we can see just how the test script above prints out its data to the SD card:

Arduino SD Printout for Test Script
We can also run the built-in Arduino script called “listfiles” to further ensure that our script is working properly. At the top of the printout from listfiles, the “test.csv” file should be printed with its approximate size. These checks all ensure that our program is working properly, along with our SD card module and micro SD card. Moreover, if the user wants to surely verify that the data is being saved, they can always eject the micro SD card and read it on a computer via the USB port. Excel or a similar program should easily read the .csv data.
Ideally, we don’t want to be deleting files and would prefer to iterate over existing files to create an array of files that make sense chronologically. In this tutorial, I will only work with the root directory and create files based on a particular naming convention. Using this convention, we will be able to create up to 1000 unique files running the same program without overwriting. I have created a simplified script based on the “listfiles” SD routine which will list all the files in the root directory of the SD card. That routine is printed below.
//Printing files in the root directory of an SD card
#include <SPI.h>
#include <SD.h>
File root;
void setup() {
  Serial.begin(9600);
  if (!SD.begin(4)) {
    Serial.println("initialization failed!");
    while (1);
  }
  root = SD.open("/");
  while(true){
    File entry = root.openNextFile();
    if (!entry){
      break;
    }
    Serial.println(entry.name());
  }
}
void loop() {
  // nothing happens after setup finishes.
}
Using this routine, we can check the files in the directory and ensure that our routines are working correctly. We want to ensure that we iterate over specific files named “DATAxxx” where xxx is a number from 0-999. For example, we can name a file “DATA000” in the first run of a program. The next time the program is started, the routine will automatically create a file called “DATA001” and the next will be “DATA002” and so on. It is also important to note that no other files should have three numbers in the 4-7 position in the root folder. As long as this is true, there should be no issues with the naming procedure in the routines to follow. If ever in doubt, run the list files program above and verify that files are being created in the proper incremental order. This will be important later in this tutorial.
The BME280 is wired in I2C mode such that pressure, temperature, and humidity can be read using the “Wire” library on the Arduino. The BME280 library can be downloaded from Adafruit’s website. We will be logging temperature, humidity, pressure, and calculated altitude. To start, I have included a simple demo of the BME280 that prints the aforementioned variables as comma separated values to the serial port. The code is shown below.
//Simple printout of BME280 sensor variables in csv format
#include <Wire.h>
#include <SPI.h>
#include <Adafruit_Sensor.h>
#include <Adafruit_BME280.h>

#define SEALEVELPRESSURE_HPA (1013.25)
Adafruit_BME280 bme; // I2C

void setup() {
    Serial.begin(9600);
    if (!bme.begin()) {
        Serial.println("Could not find a valid BME280 sensor, check wiring!");
        while (1);
    }
}
void loop() {
  String vars = "";
  vars += String(bme.readTemperature());
  vars += ",";
  vars += String(bme.readHumidity());
  vars += ",";
  vars += String(bme.readPressure());
  vars += ",";
  vars += String(bme.readAltitude(SEALEVELPRESSURE_HPA));
  Serial.println(vars);
}
The BME280 uses the barometric formula to approximate altitude as a function of pressure variation in the atmosphere. For highly accurate measurements, the “SEALEVELPRESSURE_HPA” variable should be updated using a calibrated value from a nearby weather station, however, for the simple purposes of this tutorial, that is not necessary. We can still approximate quick variations in altitude using the standard sea level pressure (1013.25 hPa).

Now that we have an idea of what to expect from both the SD module and BME280 pressure sensor, we can save the data to the SD card and verify the results. The full BME280 SD saver code is shown below, which is essentially an implementation of the BME280 code above and the SD saver method, along with the naming convection discussed above that prevents overwriting. The full code is given below and at the project’s GitHub page.
#include <Wire.h>
#include <SPI.h>
#include <SD.h>
#include <Adafruit_Sensor.h>
#include <Adafruit_BME280.h>

File main_folder; // initialize folder for saving
File dataFile; // initialize sd file
const int chipSelect = 4; // CS pin on sd card module
int prev_file_indx = 0; // used for file naming
String fileName = "000";

// measurements taken at r_0 (sea level)
const float station_elev = 11.0; // station elevation (KNYC used here)
const float p_0 = 1017.3*100.0;

Adafruit_BME280 bme; // start BME sensor

void setup() {
//    Serial.begin(9600); // use serial port if printout is desired
    // verify BME280 is working
    bool status;
    status = bme.begin();
    if (!status) {
        while (1);
    }
    // verify SD card is working
    if (!SD.begin(chipSelect)) {
      return;
    }
    main_folder = SD.open("/");
    fileName = sd_saver(main_folder);
}

void loop() {
  // SD save section
  String data_array = "";
  data_array += String(millis()); // save milliseconds since start of program
  data_array += ",";
  data_array += String(bme.readTemperature()); // save temp
  data_array += ",";
  data_array += String(bme.readHumidity()); // save humidity
  data_array += ",";
  data_array += String(bme.readPressure()); // save pressure in Pa
  data_array += ",";
  data_array += String(bme.readAltitude(p_0/100.0)+station_elev); // save altitude from Adafruit routine

  // SD Card writing and saving
  dataFile = SD.open("DATA"+fileName+".csv",FILE_WRITE);
  // if the file is valid, write to it:
  if(dataFile){
    dataFile.println(data_array);
    dataFile.close();
  }
  delay(100);
}

String sd_saver(File dir){
  while(true){
    // iterate all files to ensure no overwrites
    File entry = dir.openNextFile();
    if (!entry){
      break;
    }
    // naming routine
    String entry_name = entry.name();
    if ((entry_name.substring(4,7)).toInt()>=prev_file_indx){
      prev_file_indx = (entry_name.substring(4,7)).toInt()+1;
      if (prev_file_indx>=100){
        fileName = String(prev_file_indx);
      } else if (prev_file_indx>=10){
        fileName = "0"+String(prev_file_indx);
      } else{
        fileName = "00"+String(prev_file_indx);
      }
    }
    entry.close();
  }
  return fileName;
}

Arduino Datalogging Setup with LiPo Battery and SD Module
By running the code above, the BME280 temperature, humidity, pressure, and altitude data should be outputted in the following manner to a .csv file:

A sample plot of the altitude approximation is shown in the plot below. The sensor was raised 2.15 m and then returned to the original location, all of which can be seen in the figure (with a few caveats).

We can see several artifacts of the BME280 sensor. At 10Hz (delay of 100 ms), the noise is about 25 cm on the altitude calculation. Furthermore, as time goes on the pressure measurements begin to drift. This drift is a result of the natural atmospheric pressure changes. Therefore, the BME280 performs best during quick changes in pressure such as moving elevators, walking up stairs, or drones flying vertically. One way to clean up the measurements is to take a convolution of the measurements over time - this will steady the resulting signal and allow for better approximation of changing altitudes.
In this tutorial, a simple datalogging system using Arduino was explored using a novel file saving method and real-world data. Using the methods outlined above, the BME280 pressure sensor outputted temperature, humidity, pressure, and altitude, all of which were saved to a unique file onto an SD card. The SD card method is useful for situations where users want to save data over a long period or use a portable solution for taking measurements. Once the data is saved onto the SD card, the user can take the data and process it on any platform by parsing the data using the simple comma separated formatting. This allows for a range of applications in weather, drones, indoor positioning, and other fields where portable or long-term data acquisition is important.
See More in Arduino: