Recording Audio on the Raspberry Pi with Python and a USB Microphone
The Raspberry Pi is capable of recording audio through its USB 2.0 ports using the advanced Linux sound architecture (ALSA). The RPi can sample at 48kHz at a bit depth of 16-bits, which allows the user to record and playback fairly good quality audio. For this tutorial, I will demonstrate the process of enabling a USB audio device and using it to record and analyze acoustic signals using Python 3.x. The Python audio analysis is a great tool for engineers interested in acoustic or audio processing and even signal processing techniques.
Selecting and Recognizing The USB Microphone
You can elect to purchase the USB Microphone from our store, or below in the list of links for USB microphones and sound cards compatible with the Raspberry Pi. Depending on the application, the user may want to buy a nicer microphone (higher bit-depth, larger dynamic frequency range, higher sampling audio card, etc.) or a cheaper one may suffice. Cheaper and mid-tier microphone links are listed below. The microphone in our store is a fairly inexpensive microphone that is compatible with Raspberry Pi and also boasts a frequency response of 20 Hz - 16 kHz, so it is ideal for most acoustic applications.

After acquiring the USB mic and plugging it into one of the RPi USB ports, we need to ask the RPi if it is communicating with the audio device. Type the following into the command window:
pi@raspberrypi:~ $ lsusb -t
The output should look something like the following:
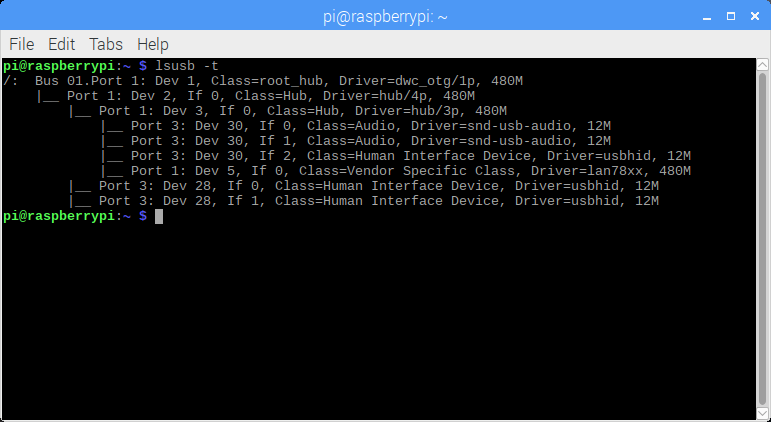
This output lets us know the Pi is reading the USB microphone because of its response: “Class=Audio, Driver=snd-usb-audio” - and if you are seeing a similar response, then congratulations! Your USB mic is ready to go. The Pi isn’t quite ready to use the USB mic, but I will discuss this in the next section.
Installing the Correct Audio Tools for the Raspberry Pi
We will be using the Python library ‘pyaudio’ to record and play audio data from the USB mic. Before we can get started with ‘pyaudio,’ we need to ensure that the RPi has all the necessary prerequisites by installing the following packages:
pi@raspberrypi:~ $ sudo apt-get install libportaudio0 libportaudio2 libportaudiocpp0 portaudio19-dev
If the above is successful, then we can download the ‘pyaudio’ library (I’m installing to Python 3.x with ‘pip3’):
pi@raspberrypi:~ $ sudo pip3 install pyaudio
Assuming the two installs above have been successful, open Python 3.x and import pyaudio. If everythin has been successful, we are ready to head to the next section and ensure that the USB mic is functioning and the Pi has selected the correct device.
Testing the USB Mic and Pyaudio
Open Python 3.x and type the following (I use IDLE):
>>> import pyaudio
>>> p = pyaudio.PyAudio()
>>> for ii in range(p.get_device_count()):
>>>     print(p.get_device_info_by_index(ii).get('name'))
This should output the index of each audio-capable device on your Pi. For my Pi, my output looked like this:

Take note of the index of the USB device, because we will need to adjust the pyaudio device index according to the sequence above. For example, our USB device index is “2” (index 0 is ALSA blank, index 1 is IEC958/HDMI, etc…).
Take note of the index of the USB device, because we will need to adjust the pyaudio device index in reference to the sequence above. For example, my USB device is located at index 2 (index 0 is ALSA main, index 1 is IEC958/HDMI, etc…).
Now that we’ve identified the USB mic’s index, we can record a test sample with pyaudio. For in-depth information about the use of pyaudio, find its documentation here.
import pyaudio
import wave

form_1 = pyaudio.paInt16 # 16-bit resolution
chans = 1 # 1 channel
samp_rate = 44100 # 44.1kHz sampling rate
chunk = 4096 # 2^12 samples for buffer
record_secs = 3 # seconds to record
dev_index = 2 # device index found by p.get_device_info_by_index(ii)
wav_output_filename = 'test1.wav' # name of .wav file

audio = pyaudio.PyAudio() # create pyaudio instantiation

# create pyaudio stream
stream = audio.open(format = form_1,rate = samp_rate,channels = chans, \
                    input_device_index = dev_index,input = True, \
                    frames_per_buffer=chunk)
print("recording")
frames = []

# loop through stream and append audio chunks to frame array
for ii in range(0,int((samp_rate/chunk)*record_secs)):
    data = stream.read(chunk)
    frames.append(data)

print("finished recording")

# stop the stream, close it, and terminate the pyaudio instantiation
stream.stop_stream()
stream.close()
audio.terminate()

# save the audio frames as .wav file
wavefile = wave.open(wav_output_filename,'wb')
wavefile.setnchannels(chans)
wavefile.setsampwidth(audio.get_sample_size(form_1))
wavefile.setframerate(samp_rate)
wavefile.writeframes(b''.join(frames))
wavefile.close()
The output .wav file should be 3 seconds long (assuming the code above is unchanged) and is sampled at 44.1kHz with a maximum resolution of 16-bits. Depending on the microphone used, the sample rate can be increased to 48kHz. The bit-depth can be changed as well, though I’m not entirely sure of the limitations on the Pi’s capabilities there.
Conclusion
This tutorial covers how to record audio using a USB microphone and a Raspberry Pi. Using Python’s pyaudio library, I demonstrated how to prepare the Pi for audio recording and saving the audio as a .wav file. The Pi, with a high-quality microphone, is capable of mid-tier audio recording (16-bit, 48kHz). This method could be used to produce and record podcasts, instruments, or any type of audio recording at that resolution and sampling rate. In the next audio tutorial, I will demonstrate how to analyze the USB audio recorded on the RPi in real-time. That tutorial will involve more in-depth programming, signal processing, and acoustic analysis.
For More in Raspberry Pi and Audio:


