Real-Time Graphing in Python Part II: Using a Word Cloud to Visualize Wikipedia Edits
"Wikipedia is a free encyclopedia, written collaboratively by the people who use it. It is a special type of website designed to make collaboration easy, called a wiki. Many people are constantly improving Wikipedia, making thousands of changes per hour. All of these changes are recorded in article histories and recent changes."

Creating a Random Word Cloud
Using the words from a Lorem Ipsum paragraph, I will demonstrate the simple usage of a Python Word Cloud function. You can find the whole Python Word Cloud project folder on GitHub [here]. Click on the bar below to show the code used to produce the animation in the GIF below.
import random
import matplotlib
import matplotlib.pyplot as plt
import numpy as np

# function for live-plotting
def live_plotter(ax,words,x_loc,y_loc,color,size_input,rotation):
    if ax==[]:
        plt.ion()
        fig = plt.figure(figsize=(11,6),facecolor='#3b3b3b')
        ax = fig.add_subplot(111,frameon=False)
        ax.axes.get_xaxis().set_visible(False)
        ax.axes.get_yaxis().set_visible(False)
        annot1 = []
        plt.show()
        return ax,annot1

    annot1 = ax.annotate(words,xy=(x_loc,y_loc),fontsize=size_input,xycoords='figure pixels',color=color,rotation=rotation)
    plt.pause(0.01)

    return ax,annot1

# initialize the figure so that we can loop and add words
ax = []
font_pixel_density = 20
ax,annot1 = live_plotter(ax,' ',0.0,0.0,'k',font_pixel_density,0)
fig = ax.get_figure()
fig_size = fig.get_dpi()*fig.get_size_inches()
# choose colormap
cmap = matplotlib.cm.get_cmap('tab20c')

# random word vector - insert words in parentheses below
lorem_ipsum = " insert words here"

# splitting word based on spaces
words_for_cloud = (lorem_ipsum.strip(',')).split(' ')
# loop through words
for ii in range(0,len(words_for_cloud)):
    annot_text = words_for_cloud[ii]
    # find the size of the word in pixels
    annot_x_size = len(words_for_cloud[ii])*font_pixel_density
    # randomize the location of the word
    zoom_ratio = 0.95
    x_loc = random.uniform(0.0+zoom_ratio,1.0-zoom_ratio)*(fig_size[0]-annot_x_size)
    y_loc = random.uniform(0.0+zoom_ratio,1.0-zoom_ratio)*(fig_size[1]-font_pixel_density)

    # randomize the color,rotation angle, and size of the word text
    color =  matplotlib.cm.colors.to_hex(cmap(np.random.rand(1))[0])
    rotation = random.uniform(-1, 1)*30
    size_var = random.uniform(0.4,1)*font_pixel_density

    # here is the loop for checking whether the new annotation interferes with others - if it does
    # we remove the old text
    prev_children = ax.get_children()
    ax,annot1 = live_plotter(ax,annot_text,x_loc,y_loc,color,size_var,rotation)
    for ii in prev_children:
        try:
            jj = (annot1.get_window_extent()).extents

            if jj[2]-ii.get_window_extent().extents[0]>=0 and ii.get_window_extent().extents[2]-jj[0]>=0 and\
               jj[3]-ii.get_window_extent().extents[1]>=0 and ii.get_window_extent().extents[3]-jj[1]>=0:
                ii.remove()
        except:
            pass

The word cloud above utilizes rotation, size variation, and color mapping all using Python and a simple matplotlib annotation. There are many possibilities from here involving word clouds, and one such example using Wikipedia will be covered in the next section.
UPDATE: Newer and nicer code using spiral format below
import random
import matplotlib
import matplotlib.pyplot as plt
import numpy as np

# function for live-plotting
def live_plotter(ax,words,x_loc,y_loc,color,size_input,rotation):
    if ax==[]:
        plt.ion()
        fig = plt.figure(figsize=(11,6),facecolor='#3b3b3b')
        ax = fig.add_subplot(111,frameon=False)
        ax.axes.get_xaxis().set_visible(False)
        ax.axes.get_yaxis().set_visible(False)
        annot1 = []
        plt.show()
        return ax,annot1

    annot1 = ax.annotate(words,xy=(x_loc,y_loc),fontsize=size_input,xycoords='figure pixels',color=color,rotation=rotation)
    plt.pause(0.01)

    return ax,annot1

# initialize the figure so that we can loop and add words
ax = []
font_pixel_density = 20
ax,annot1 = live_plotter(ax,' ',0.0,0.0,'k',font_pixel_density,0)
fig = ax.get_figure()
fig_size = fig.get_dpi()*fig.get_size_inches()
# choose colormap
cmap = matplotlib.cm.get_cmap('tab20c')

# random word vector
lorem_ipsum = """Lorem ipsum dolor sit amet, consectetur adipiscing elit"""

# splitting word based on spaces
words_for_cloud = (lorem_ipsum.strip('.')).split(' ')
# loop through words
for ii in range(0,len(words_for_cloud)):
    annot_text = words_for_cloud[ii]
    # find the size of the word in pixels
    annot_x_size = len(words_for_cloud[ii])*font_pixel_density
    # randomize the location of the word
    size_weight_x = ((ii)/len(words_for_cloud))*0.8
    size_weight_y = ((ii)/len(words_for_cloud))*0.8
    spiral_speed = 0.1
    x_loc = (fig_size[0]/2)+(random.choice([random.uniform(-size_weight_x-spiral_speed,0),random.uniform(0,size_weight_x+spiral_speed)])*(fig_size[0]/2))
    y_loc = (fig_size[1]/2)+(random.choice([random.uniform(-size_weight_y-spiral_speed,0),random.uniform(0,size_weight_y+spiral_speed)])*(fig_size[1]/2))

    # randomize the color,rotation angle, and size of the word text
    color =  matplotlib.cm.colors.to_hex(cmap(np.random.rand(1))[0])
##    rotation = random.uniform(-1, 1)*30
    rotation = random.choice([-1,0,0,0,0,0,0,0,0,0,0,0,0,0,0,0,1])*90
    size_var = (random.uniform(0.4,1)*font_pixel_density)

    # here is the loop for checking whether the new annotation interferes with others - if it does
    # we remove the old text
    prev_children = ax.get_children()
    ax,annot1 = live_plotter(ax,annot_text,x_loc,y_loc,color,size_var,rotation)
    for kk in prev_children:
        if isinstance(kk, matplotlib.text.Annotation):
            kk_extents = kk.get_window_extent().extents
            jj = (annot1.get_window_extent()).extents

            if kk_extents[2]-jj[0]>0 and jj[2]-kk_extents[0]>0 and kk_extents[3]-jj[1]>0 and\
                  jj[3]-kk_extents[1]>0:
                annot1.remove()
                break
            elif jj[2]>fig_size[0]:
                annot1.set_position((fig_size[0]-jj[2],jj[3]))
            elif jj[3]>fig_size[1]:
                annot1.set_position((jj[2],fig_size[1]-jj[3]))

plt.savefig('word_cloud_spiral.png',facecolor=fig.get_facecolor(), edgecolor='none',dpi=95)

Word cloud created using the spiral method
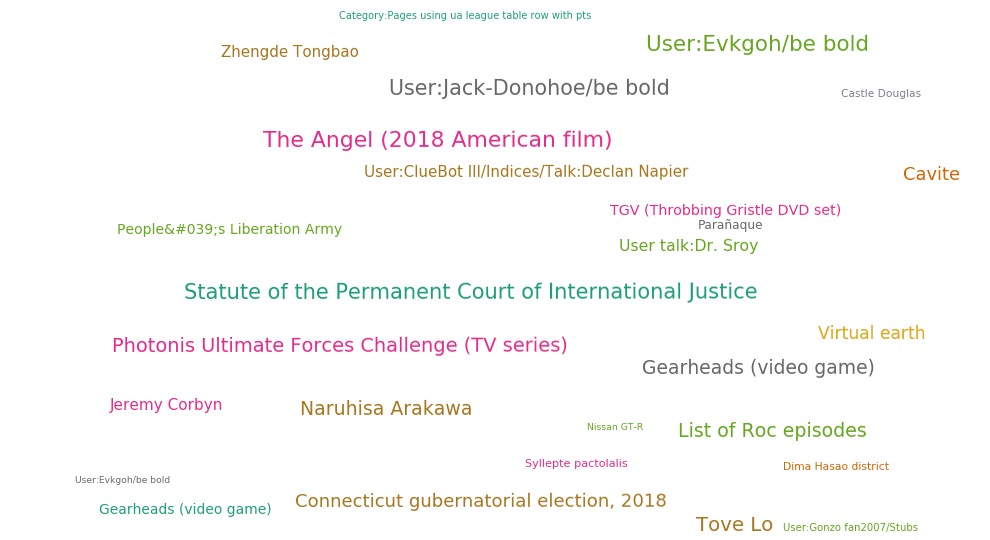
Word Cloud Visualization of Wikipedia Edits
Now that we have the word cloud generator working in conjunction with the live-plotter, we can use the Wikipedia recent changes page to test the function in real-time. The url that we need to crawl in order to view recent changes is:
In order to crawl the above page, I use the following Python method that gets webpage information via the requests library:
import requests

def html_crawl(key1,content):

    wiki_indx = [i+len(key1) for i, j in enumerate(content) if content[i:i+len(key1)] == key1]

    wiki_titles = []
    end_key = '">'
    for ii,indx in enumerate(wiki_indx):
        for mm in range(0,200):
            if content[indx+mm:indx+mm+len(end_key)]==end_key:
                wiki_titles.append(content[indx:indx+mm])
                break

    return wiki_titles

def wiki_crawl():
    page = requests.get('https://en.wikipedia.org/wiki/Special:RecentChanges?hidebots=0&hidecategorization=1&hideWikibase=1&hidelog=1&limit=50&days=1&urlversion=1')
    content = page.text
    key1 = 'class="mw-changeslist-diff" title="'

    wiki_edits = html_crawl(key1,content)
    return wiki_edits

if __name__=="__main__":
    wiki_edits = wiki_crawl()
The above code will crawl Wikipedia's recent changes page for edits made by users and return the title of each page edited.
If everything looks good, we now want to take those titles and create a dynamic word cloud. We can do so by combining the Wikipedia page crawl and the word cloud above and use a while-loop to incorporate Wiki edit titles on the recent changes page. The word cloud result should look similar to the .gif below:
The full code used to create the dynamic word cloud can be found below (click to expand):
import requests,random
import matplotlib
import matplotlib.pyplot as plt
import numpy as np

def html_crawl(key1,content):

    wiki_indx = [i+len(key1) for i, j in enumerate(content) if content[i:i+len(key1)] == key1]

    wiki_titles = []
    end_key = '">'
    for ii,indx in enumerate(wiki_indx):
        for mm in range(0,200):
            if content[indx+mm:indx+mm+len(end_key)]==end_key:
                wiki_titles.append(content[indx:indx+mm])
                break

    return wiki_titles

def wiki_crawl():
    page = requests.get('https://en.wikipedia.org/wiki/Special:RecentChanges?hidebots=0&hidecategorization=1&hideWikibase=1&hidelog=1&limit=50&days=1&urlversion=1')
    content = page.text
    key1 = 'class="mw-changeslist-diff" title="'

    wiki_edits = html_crawl(key1,content)
    return wiki_edits


def live_plotter(ax,words,x_loc,y_loc,color,size_input,rotation):
    if ax==[]:
        plt.ion()
        fig = plt.figure(figsize=(11,6))
        ax = fig.add_subplot(111,frameon=False)
        ax.axes.get_xaxis().set_visible(False)
        ax.axes.get_yaxis().set_visible(False)
        annot1 = []
        plt.show()
        return ax,annot1

    annot1 = ax.annotate(words,xy=(x_loc,y_loc),fontsize=size_input,xycoords='figure pixels',color=color,rotation=rotation)
    plt.pause(0.01)

    return ax,annot1

ax = []
font_pixel_density = 17 #16px per character
wiki_vals = wiki_crawl()
ax,annot1 = live_plotter(ax,' ',0.0,0.0,'k',font_pixel_density,0.0)
fig = ax.get_figure()
fig_size = fig.get_dpi()*fig.get_size_inches()
cmap = matplotlib.cm.get_cmap('tab10')
while True:
    wiki_vals = wiki_crawl()

    for ii in range(0,len(wiki_vals)):

        annot_text = wiki_vals[ii]
        # find the size of the word in pixels
        annot_x_size = len(wiki_vals[ii])*font_pixel_density
        # randomize the location of the word
        zoom_ratio = 0.95
        x_loc = random.uniform(0.0+zoom_ratio,1.0-zoom_ratio)*(fig_size[0]-annot_x_size)
        y_loc = random.uniform(0.0+zoom_ratio,1.0-zoom_ratio)*(fig_size[1]-font_pixel_density)

        # randomize the color,rotation angle, and size of the word text
        color =  matplotlib.cm.colors.to_hex(cmap(np.random.rand(1))[0])
##        rotation = random.uniform(-1, 1)*30
        rotation = 0.0
        size_var = random.uniform(0.4,1)*font_pixel_density
        prev_children = ax.get_children()
        ax,annot1 = live_plotter(ax,annot_text,x_loc,y_loc,color,size_var,rotation)
        for ii in prev_children:
            try:
                jj = (annot1.get_window_extent()).extents
                if jj[2]-ii.get_window_extent().extents[0]>=0 and ii.get_window_extent().extents[2]-jj[0]>=0 and\
                   jj[3]-ii.get_window_extent().extents[1]>=0 and ii.get_window_extent().extents[3]-jj[1]>=0:
                    ii.remove()

            except:
                pass
Conclusion
In this tutorial I demonstrated how to create a live word cloud using Python. As an example, I first scattered a Lorem Ipsum paragraph around a matplotlib figure to create a simple word cloud with words that vary in size, color, and rotation angle. Then, I used a real-world example that showed the user how to crawl Wikipedia's recent changes page and plot each Wiki title to a dynamic word cloud casting each recent change onto a figure full of multi-colored words. Using these examples and the code above, the user is capable of creating their own word cloud using any series of words or titles.
See More in Live Plotting and Python: